
Jerry Saltz – How to be an artist
What is good advice for life is typically also good advice for art, and vice versa.
Jerry Saltz – How to be an artist
What is good advice for life is typically also good advice for art, and vice versa.
The writer never really succeeds in making the Simulmatics story seem important, partly because due to endless digressions about the bad marriages of the men who founded the company and partly because she avoids any substantial assessment of the actual models they used.
Ward Fransworth – The practicing Stoic
there is no reason to get too excited about this book.
Malcolm Gladwell – Talking to strangers
Gladwell once more makes his well known point that prejudice is often subconscious and institutionalized (cf. also Blink), this time inspired by a BLM atrocity.
Martin Kleppmann – Designing Data-intensive applications
Surprisingly readable for a text of this sort of technical depth
The detailed synopsis of (what seems like) every book, play, or movie that ever mentioned rabies gets boring pretty fast.
Colin Brayer and Bill Carr – Working backwards
Somehow, there is no mention of pee bottles or other excesses concerning operational staff in the book.
Joshua Foer – Moonwalking with Einstein
Endearing blend of journalism and personal experience.
The seemingly controversial thesis turns out to be a platitude hidden behind a carefully crafted facade of definitions.
Brian Christian – The most human human
Unfortunately, the book does not explicitly challenge if humans are adequate judges in the Turing test.
Michael Pollan – How to change your mind
It is much harder to relate to the author’s obsession, which seems mostly driven by a some vague feeling of disappointment concerning life in general.
First install the LEMP stack on the server like so (to make sure we are prepared for what comes later when I will also use the database to serve a website).
To make the database accessible I first downloaded it from my hosting provider’s through myphpadmin. And then used this tutorial to load it.
I set up the local environment on the client (windows laptop) from which we will access the database. On the Windows laptop I use Conda as environment manager.
conda create -n db-test
conda activate db-test
pip install mariadb
Make sure you run these with root permissions (or as administrator on Windows 10).
We need to allow access to the database on the server through the firewall. Of course we restrict to local IP addresses only.
sudo ufw allow proto tcp from 192.168.178.0/24 to any port 3306From there we follow the steps here, using this version:
sudo nano /etc/mysql/mariadb.conf.d/50-server.cnfIn that last file change the bind address tobind-address = 0.0.0.0
Set up a user with access from your specific client IP address in Madiadb on your server.
CREATE USER 'user'@'you.rcl.ien.t' IDENTIFIED BY 'password';
SELECT User, Host, Password FROM mysql.user;
GRANT SELECT, INSERT, UPDATE, DELETE, DROP  ON your_db.* TO 'test'@'you.rcl.ien.t';
For connecting I use the python connector.
With this script:
#!/usr/bin/env python

import mariadb
import sys

# Define mariadb connection configuration
config = {
  'user': 'user',
  'password': 'password',
  'host': 'you.rse.rve.r',
  'database': 'your_db',
  'port': 3306
}
# Instantiate Connection
try:
    conn = mariadb.connect(**config)
    print(f'Yup! {conn}')
    conn.close()
except mariadb.Error as e:
    print(f"Error connecting to MariaDB Platform: {e}")
    sys.exit(1)
Get pip, venv, and git:
sudo apt install python3-pip
apt-get install python3-virtualenv
sudo apt install python-is-python3
sudo apt install git
Set up LEMP stack following this tutorial.
Jordan Ellenberg – How not to be wrong
A cornucopia of charming mathematical anecdotes and facts
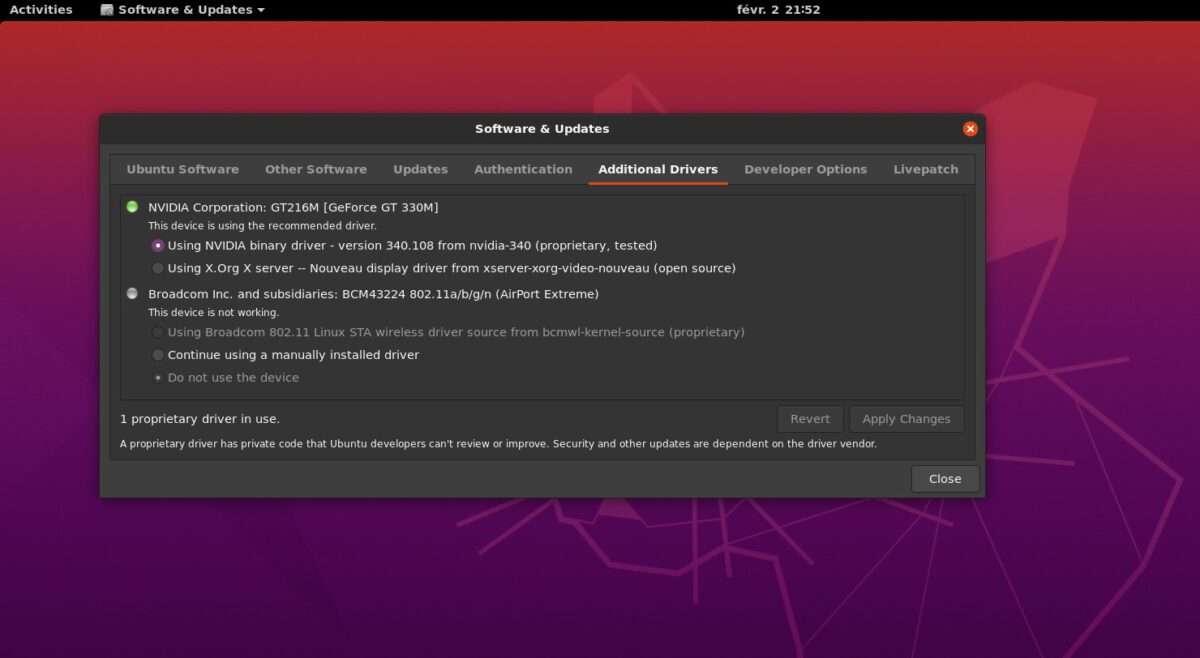
Switching to the NVIDIA proprietary graphics driver led to a crash. I did not have a live disk, so I had to do a full re-install.
Couple of tweaks. First of all, there is a more rigorous fix for the NVIDIA driver boot issue here. At least there is now a Grub menu so that debugging is possible.
I have not yet dared to use the NVIDIA driver again. But in the start-up logs there is still an error related to the open source driver which seems to slow down the boot process.
To see boot errors:
journalctl -b | grep errorOne of the things I try is this to solve the NXDOMAIN error that I saw in the boot log:
sudo rm -r /etc/resolv.conf
sudo ln -s /run/systemd/resolve/resolv.conf /etc/resolv.conf
Also followed this tip and re-installed Gnome:
sudo apt-get install --reinstall systemd gnome-settings-daemon gnome-settings-daemon-commonAnd enabled canonical-livepatch with a new token, as described here.
sudo snap install canonical-livepatch
sudo canonical-livepatch enable [#yourverylongtoken#]Regularly I got a ‘white noise’ screen after closing/opening the laptop lid without logging out. Apparently that is a graphics driver issue. Luckily there is a simple way to switch over to the proprietary Nvidia driver.
As I was sitting on the coach I wanted to do this via remote desktop from my Windows computer. Also that was quite straightforward.
Still have to test the new graphics driver, though…
And update, one day later:
OUCH. Restart does not work. Everything dead. Not ssh connection. Reboot aborts. Black screen. Need to re-install everything.
Errors:
This solved both the ssh connection and made sure the screen woke up again after re-opening: https://askubuntu.com/questions/1059705/keep-a-laptop-running-with-closed-lid
Closing the lid for a long time when logging still gives color noise. Apparently it is an issue with the open source driver. There is however a NVIDIA proprietary driver. More about that later.
My old MacBook Pro (mid 2010) had 2x2GB RAM installed.
Maximum capacity is 2x4GB.
It is easy to upgrade, following this tutorial.
The purposeful one-sided rant makes the book lose all credibility, in particular since the arguments can easily be reversed – especially in the wake of Trump’s desperate challenge the US election outcome.
SMB is the service that sets your Linux box up as a file server.
Quite a bit seems to have changed in Windows security settings and there are quite a lot of outdated howto ages out there.
I found one tutorial that works… almost.